Tuesday, September 14, 2010

Cream of Broccoli... Splendublerous!


Hello Again!

I’m sure that today’s entry probably seems a little tame, but let me tell you… if you love creamy heart warming goodness you’ll like this one for sure! Pair it with a nice little sammich, or a side salad and you’ll realize what gold you’ve really got. If you don’t like broccoli well then maybe this isn’t for you but I’m quite sure after making this, that this recipe could be translated using many different veggies instead! Cream of Cauliflower maybe? Yum Yum! One of the best things about this soup is that it’s not too rich to eat it often. There is a little cream, but it could be substituted for a “dollop of crème fraiche, or even yogurt”. Another secret is that flour is added to promote a creamy texture. Don’t worry you’ll like it!

This recipe comes from “The Culinary Institute of America –Vegetables”. (One of the culinary world’s top schools in America)

Let’s begin shall we?

Here’s what you’ll need:

7 QT Dutch Oven
Emersion Blender or Food Processor
2 lbs broccoli
¼ cup vegetable or olive oil
1¼ cups chopped onions
½ cup chopped celery
1¼ cups chopped leeks, white and light green parts (1 leek is enough)
¼ cup all purpose flour
6 cups Chicken Broth
(This can be substituted for Vegetable Broth for all you Vegetarians out there… and don’t forget how easy it is to make your own!)
½ cup heavy cream, heated
Fresh lemon juice, to taste
Salt and Pepper to taste

Start by separating your broccoli into florets and stems. If you are using whole broccoli chunks instead of buying florets you’ll need to chop off a little of the ugly bottom, and then trim off the tough outer parts of the long stems…. Nothing worse than choking on the stabbing spears of tough broccoli stem my friends. If you’d like to make your life easier simply just buy the florets… but in reality that is a tad lazy, ANYWAY! Set aside about a cup of small florets for later. --- You are more than welcome to skip this part if you simply want to drink your cream of broccoli soup, but how boring is that! --- once you’ve set aside a cup of florets you can combine and continue to chop up your broccoli and stems keeping in mind that the more bite-sized you chop it the easier it will be if you are using an emersion blender.


Chop up your onion (1¼ cups chopped is going to be about ¾ ths of one LARGE onion), celery (I had some in my freezer—about 2 stalks worth and I dumped it all in without measuring it because I love a well seasoned meal), and leeks (Please note how to properly deal with leeks if you don’t already know: You must peel off at least 3 or 4 of the outer layers from the outside and then chop off almost all of the dark green you see at the top, stopping when you get to the light green!--- if you are looking to make that great homemade vegetable stock I mentioned earlier this is a great thing to add to your freezer baggie!--- please don’t attempt to throw this part in the pot while no one is looking kiddies unless you enjoy chewing on straw!).


Add the chopped onion, celery, leeks, and broccoli to the pot and sauté until the onions are clear, stirring constantly on a medium fire; if it starts to burn you need to turn your fire down…. Stir for about 5 minutes. Add in the flour and stir to coat, and continue to stir frequently. Now add in your stock. There shouldn’t be any lumps but if there are for some reason just whisk or break apart. Bring this to a simmer and cook covered for about 45 minutes at a simmering boil, checking every once in a while to make sure that you are not losing too much liquid.


I did some Yoga in the meantime. But hey, this would also be a great time to heat up some water to either give a quick 4 minute boil or steam to that cup of broccoli florets you set aside earlier. Once you’ve done that, set it to the side again…

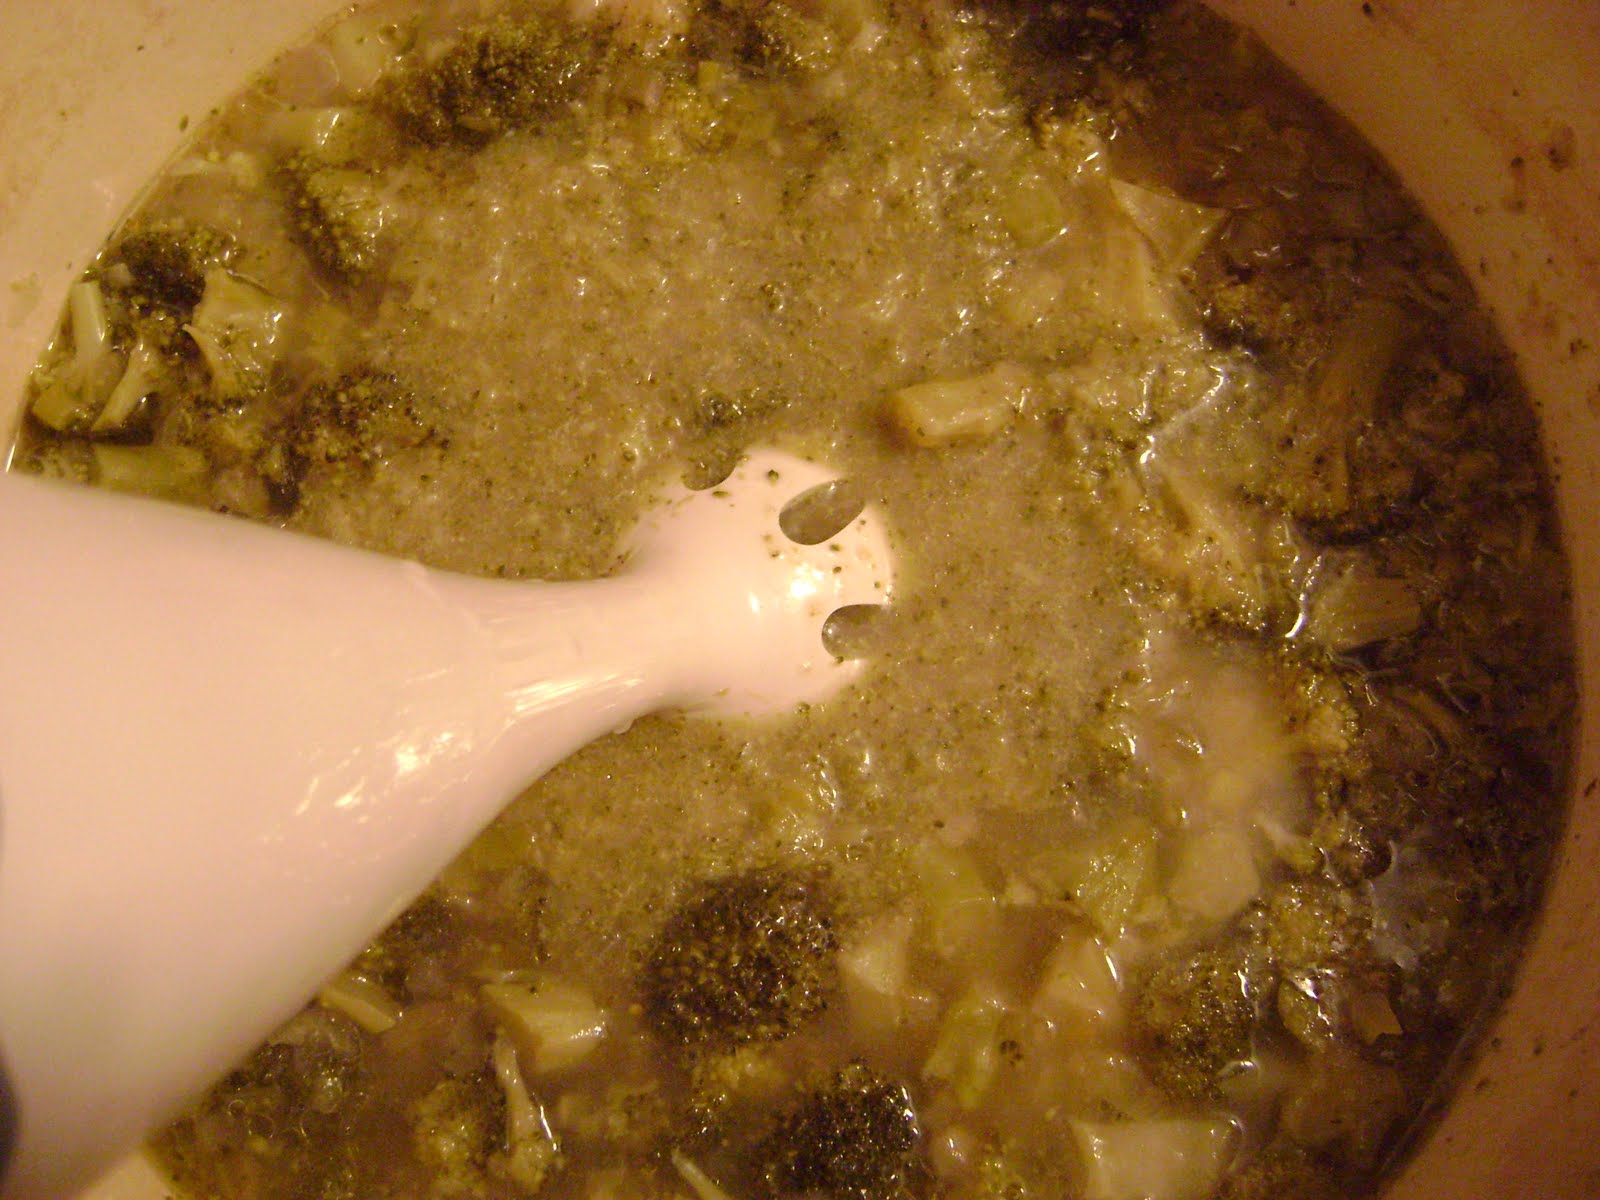
When the 45 minutes is up take it off the fire and let it cool for at least 10 minutes. If you are using your emersion blender have at it right there in the pot. If not you’ll need to strain the contents of your pot to separate the solids from the liquids and puree it a little at a time using a food processor. First you’d put in your solids making sure not to overload (maybe only about half way) and then slowly add in the liquid through the feed tube until it’s creamy and pureed. If there’s more to be pureed keep going until it’s all done, switching out the pureed stuff for solids and liquids. When you’re done pureeing each batch add it back to the pot until its all done.


So if you’re trying to make a giant heaping mess of it so that you have it on hand this would be the point where you’d stop and let it cool off completely before freezing it in baggies. The recipe says 2 days in the fridge or up to 1 month in the freezer… soooo onward!

Return your soup to a simmer… while you’re doing that, take a small pot and put in your half cup of heavy cream, to warm it. Watch it because this only takes moments. When it’s warm add it into the pureed broccoli pot and mix to combine. Now add in your boiled/steamed broccoli florets that you set aside earlier!


Here is where I finally salted my soup. With my dutch oven one regular recipe creating anywhere from 4 to 6 cups of food usually takes once forth and back of a pot wide salting, remember too to take into account that 6 cups of chicken stock were added so that will affect your salt levels needed in the end. I’m sure I could possibly explain that better but I really don’t know how; I’m so visual! So just start out with teaspoon or two, taste and go from there.

Here is where you can also add the lemon juice. I omitted this part because to me it felt like it would interfere with the creaminess… this has alas left me ignorant to the taste of lemon juice - broccoli soup but at least I can tell you that it’s amazing without it right? You go ahead and make that decision for yourself, if you’re curious you can always dish out a small bowl and give a good squirt to simply try it.

So when I was at my favorite place on earth, the farmer’s market, I picked up some sandwich items: ciabatta rolls, cheese, deli meat, grape tomatoes, and field greens… planning ahead to slap together a sandwich or two to go with this soupy delight. Here’s my dinner, now where’s yours? Chow down ladies and gents!


Monday, September 6, 2010

Ropa Vieja aka "Old Clothes"


Hello, we meet again my pretties… 

These recipes are from one of my treasured cook books, “Daisy Cooks!” by Daisy Martinez.

So this is technically going to be a two-part recipe because in order to get one of the ingredients you must prepare for another. So let’s get this going because you might want to prepare this ahead of time to cut down on kitchen time. Ropa Vieja is going to take at least 3 hours in the kitchen but it’s sooooooooooooo worth it you’ll thank yourself at the first magically wonderful taste.

Part 1: SOFRITO!

You are going to need ½ cup of Sofrito when making Ropa Vieja, so you might as well make a batch ahead of time and freeze it in baggies containing a ½ cup each. Any recipe you currently already have can be dressed up with latin flavor by simply adding some sofrito, ie roasts, chicken, even rice! Also if you decide to go out and buy one of Daisy Martinez’s books you’ll always need it on hand. If you think you might be a little weary you can always cut the recipe in half or a fourth to just try it out…. but don’t whine when you wish you’d made more... This recipe makes about 4 cups.

You’ll need:

1 Food Processor
2 medium Spanish Onions (white works great) cut into large chunks
3 to 4 Italian frying peppers or Cubanelles
16 to 20 cloves of Garlic
1 large bunch of Cilantro
4 leaves of Culantro

*(this stuff is like “Cilantro x 10” , if you can’t find it at your farmer’s market, you can substitute this for another Whole bunch of Cilantro)

7 to 10 Ajices Dulces (optional)

*(aka “Cachucha” aka “Ajicitos” … these are sweet semi-spicy peppers. But don’t mistake them for scotch bonnet or habanero peppers ... they look really similar, and even come in the same color ranges so be careful and make sure you’re picking up the right ones because there is a HUGE heat difference between the two. If you mistake them you may be in for a rocket ride to the moon)

3 to 4 ripe plum tomatoes, cored and cut into chunks
1 large red bell pepper, cored, seeded, and cut into large chunks

Chop all the larger stuff into chunks and then process everything in the food processor until you get it smooth. Like mentioned before, this will give you 8 servings storing ½ cup in each small freezer bag. You can store it for up to 3 days in your frig, or in your freezer until you need it. Note that if you decide not to freeze it right away, it will smell up your frig (if you’re finicky like that, just go ahead and freeze it)

Part 2: ROPA VIEJA

So you know when you go to a Latin restaurant and ask for a shredded steak taco… this is pretty much it but with a little extra veggies in it. You can serve this with rice or on tacos, it would even taste great on nachos… or cold out of the pan at 3 am… it is beefy divinity. Cook time is at least 3 hours so make sure you’re prepared to wait because if you skip lunch thinking you can wait your hungry little stomach will hate you for it...

Also this is Daisy’s Cuban version, traditionally it’s made with Flank steak but she prefers the chuck roast. Either way it’s amazing. Makes 6 Servings.

Here’s what you’ll need:

1 large or 7QT Dutch Oven or Oven proof dish with lid
1 (2 ¼ or 2 ½ lb) Chuck Roast, or 2 (1 ¼ lb) Flank Steaks

3 medium Carrots, trimmed and cut into ¼ inch dice
1 cup fresh or frozen Peas

*(I already had chopped frozen mixed vegetables from the farmer’s market on hand --corn, baby limas, cut green beans, carrots, and peas---so this is what I used instead of the carrots and peas separately. 3 medium carrots is about 12 oz so that’s 1 ½ cups, adding the 1 cup of peas meant that my total of chopped frozen veggies to add was 2 ½ cups)*

4 medium or 2 large Celery stalks, with leaves, peeled, cut into ¼ inch diced (i only used half this)
1 small Onion

*(The original recipe simply tells you to liberally season your meat with salt, pepper, and onion powder. Just to complicate things… of course, I hate using onion powder… so in its placed I used a small white onion. This will be explained later.)*

2 (8oz) cans Spanish-style Tomato Sauce
½ cup Sofrito
3 Tbsp Alcaparrado or chopped Pimento-stuffed Olives

*(Alcaparrado is going to be equal parts chopped pimento olives and capers)

2 Bay Leaves
¼ tsp ground Cumin
1 ½ cup Water
3 tbsp Canola Oil + Olive Oil as needed
Black Pepper and Kosher Salt as needed/ to taste

Let’s Begin!!!!

So…. I’ve made this twice using the Chuck roast: A) because 2lbs of chuck roast is cheaper, and B) because I have not been left wanting so far! Mmm

Buuuut anyway… before you start chopping up all your veggies here's a trick! Not sure if you've ever noticed but celery can be stringy.... To avoid this all you have to do is take a potato peeler to it and peel the outer layer off. Now chop away my friends... chop away.
 

Next, take your chuck roast or flank steak and pound it really well with a mallet to tenderize it. Now season all sides liberally with salt and pepper. So here’s one part where I deviated from the recipe again. The first time I tried the onion powder that she called for. Although it was good… I just like the fresh stuff better. I feel like it lends a more natural flavor and when do you go wrong with onions anyway?… In my opinion, never. These precious jewels flavor the world! 


Preheat the oven to 350 degrees.

So first I put in my diced onion until it was clear and fragrant, and then I took them out and set them aside so that when the meat was browning, the onions wouldn’t burn in the high heat. Figured I’d do that first because any extra flavor cooked in is good… but whatever.


Heat the canola oil until rippling (I just used veg oil because it’s what I had on hand, but canola oil is going to give you a better brown on your meat so by all means if you have it, use it). Add in your meat and get a good sear/brown on all sides.


Drain or spoon off most of the fat from the pan. Stir in your sofrito, 2 tsp of salt, cumin, and bring it to a boil. You may have to add a little oil to get it creamy. Stir in the tomato sauce, water, alcaparrado, and bay leaves. Bring this to a boil again, then cover it with the lid, and pop it into the oven for about 2 ½ hours or until the meat pulls apart easily with a fork. I am always afraid of burning so if you’re like me you’ll check on it. Being a little obsessive, I checked on it after the first hour. That really wasn't necessary so I decided to check it again after the second. I’m glad that I did because the pan did look a little dry so at this point I added a little water.


And now for another variation from the original recipe … Her version tells you to add the celery after it's come out of the oven while it simmers on the stove top for another 10 minutes. I didn’t like idea of possibly undercooked celery because although I love celery as a seasoning, I DO NOT like crunching on it in a dish unless its finely chopped in a macaroni salad or something... so if you want the original version look below.


My way:  At the 2 hour mark I dumped in my celery and only a little over half of what she called for! (above calls for : 4 celery stalks, so technically I only used a little over 2 large).… and shoved it back into the oven for the remaining half hour. The meat was pretty soft at this point with a “fork check” but I decided what the heck, a little extra cook time couldn’t hurt, plus it gave the celery time to soften.

After 2 ½ hours take your pot out of the oven and let it sit until it’s cool enough to handle, which for me wasn’t too long. When you’re ready, grab two forks and begin pulling apart your meat; it should be tender and easy to pull apart. If you’re using the chuck roast make sure to pull out the center most clump of fat.


This is when I put the pot back on the stove and dumped in my 2 ½ cups of frozen mixed veggies and simmered for another 10 minutes or until they were soft.


If you want do it the Daisy way: after the 2 ½ hours in the oven and shredding your meat, this is when you’d add in your chopped celery along with the carrots and that only gets cooked for 10 minutes. After this you add in your peas and cook for a few minutes more.

Once it was finally all done, I found some tortillas and sour cream. I know this version is not as traditional as it could have been but anyway here’s my end result, decide for yourself, I’m sure it’s good many ways.  SO EAT UP!